

Last updated on May 23rd, 2025 at 02:33 pm

If you’re new to camping (or have only been a handful of times), you might find putting together a complete camping plan a bit challenging. That’s totally understandable.
There is SO much to think about, and it can get overwhelming very quickly.
I have camped all over the United States and have done pretty much every type of camping you can think of, from car camping to RVing to thru-hiking the Appalachian Trail.
But even though I have a lot of experience, I still remember what it was like to be a beginner. So, I created this step-by-step guide to make everything simple for your next camping trip!
I will cover everything from basic decisions like location and duration to nitty-gritty info on what you should pack, what kind of camping is right for you, and even how to plan meals so you don’t go hungry!
How to Craft the Perfect Camping Plan
I thought about the best way to organize this camping plan for quite a while.
I decided it’s best to walk you through every decision you’ll have to make before going on a camping trip, from choosing a location to packing for the trip, step by step!
1. Decide Where You Would Like To Go
First, let’s figure out where you’d like to go camping!
You can go camping pretty much anywhere, but if you’re in the U.S., you’re fortunate to have access to a variety of landscapes and truly endless options for places to go camping.
I grew up in the Metro Detroit area and have fond memories of camping with my mom, brother, and grandparents in Northern Michigan and out West.
As I got older, I moved a lot and have hiked and camped all over, from the Rockies to the Pacific Coast, Alaska, New England, and the Appalachian Mountains.
If you’re anything like me, you’d probably enjoy camping just about anywhere!
But if you’re a little pickier, choose somewhere with a landscape you enjoy. The U.S. has many options, including desert regions, rainforests, alpine lakes, rolling hills, and much more.
👉 You can click here to browse all of the guides on this site by state or National Park to help you find a destination that interests you!
2. Pick Who Will Be Camping Along With You
Is this a solo adventure? Couples trip? Fun time with friends? Or perhaps an outing with kids?
Once you decide where you want to go, the next step is to choose whether to go on a solo adventure or if you’d like someone to go with you!
Solo trips are a fantastic chance to reconnect with yourself and unwind in true solitude. I spent a lot of my twenties traveling this way.
However, since getting married, most of my camping trips have been with my husband. And more recently, as a new mom, our trips have entered a new family camping trip phase.
It’s important to remember that the company you choose has a massive impact on the camping experience. You want to choose people who love the outdoors and have a good spirit despite adversity.
It’s not uncommon for the unexpected to happen on a camping trip, and it’s rarely as comfortable as first-world living. So, always choose camping buddies who are up for an adventure!
3. Decide How Long Your Trip Will Be
The next step is to choose how long the trip will be.
For many, this part is decided after evaluating your available vacation time and life obligations.
Beyond that, I do have some suggestions.
I absolutely love camping, but it’s also easy to fantasize in your head. I’ve seen so many newbies head into the woods only to realize, ‘Hmm, I actually don’t love sleeping outside as much as I thought!”
I always encourage brand-new campers to limit their trip to 2-3 nights.
However, if you’ve been camping before and already know you enjoy it, then spend as long as you can in nature, especially if you decide to go somewhere far from home.
I find that 1-2 weeks is an excellent amount of time for a well-rounded camping trip.
Longer trips tend to involve more planning and preparation but offer a much more rewarding and relaxing experience!
4. Figure Out Your Ideal Type of Camping
Now that you know where you’d like to go, who you’d like to go with, and for how long, the next question to ask is, “What type of camping experience would I like to have?”
There are many different ways to camp. To make the most of your camping trip, ask yourself:
- Which type of camping is best for me and my group?
- What do I want out of the adventure?
- What do I envision this camping experience looking like?
Let’s review the different types of camping to ensure you understand the differences. Then, you can choose the right option for you!
Car Camping with a Tent

I’m guessing that when most people think of camping, they initially picture car camping with a tent.
It involves reserving a site in a campground and bringing a tent, sleeping bag, and some basic tools.
You can use any type of car with this camping style. When I was younger, we would take my mom’s minivan, but I also car-camped a lot out of my little Toyota Matrix hatchback in my twenties.
Tent camping is also very inexpensive, and thousands of car campgrounds are spread across the United States, making it easily the most accessible form of camping.
Types of Campgrounds for Car Camping
There are various types of car camping campgrounds out there that you can reserve a spot at, including:
First-come, First-serve: Just like it sounds, you must show up and reserve these campsites in person. At popular campgrounds, I suggest arriving as early as possible. Also, there is usually a small fee associated with these campsites.
Reserved Campgrounds: These can be reserved online for a fee. Depending on the location, they can be as cheap as $10/night or as much as $100/night.
Boondocking (Free Camping): Dispersed and dry campsites vary wildly. (I’ll share more about the difference between dispersed and dry camping in the next RV section.) Sometimes, they are well-cared for with a fire ring, picnic table, and designated space, but other times, they’re just a patch of grass in the woods.
Group Camping: These campsites are reserved for larger groups (usually over eight people) and have multiple picnic tables, tent spaces, and fire rings. However, I’ve found that if the campground doesn’t have reservations for its group campsites, it will sometimes allow smaller groups to share the site on a first-come, first-served basis.
Tools to Find Car Camping Spots
Here are a few of my favorite tools for finding car camping spots around the U.S.
- Recreation.gov (National Park Campgrounds)
- HipCamp (Unique campsites)
- Campspot
- KOA
Tools to Find Free Car Camping Spots
- The Dyrt
- iOverlander
- BLM Land: You can camp on most BLM land as long as you follow the rules. Occasionally, you will also have to pay a small fee.
RV or Van Camping

The growing popularity of van and RV life has made this style of camping significantly more mainstream over the past decade. However, RV camping has been around for a long time.
RV and van camping are much more comfortable. They have beds, kitchen amenities with a stovetop, running water, and storage space; larger RVs even have a shower and toilet.
It feels more like a house on wheels than camping, but you still get to be out in nature!
When I was younger, we’d sometimes travel from campsite to campsite in my grandparents’ Roadtrek (one of the OG van life vehicles), but upon arrival, my brother and I would be tossed out into a tent for the evening.
After getting married, my husband and I bought a fifth-wheel RV and lived in it full-time for 3 years!
Types of Campgrounds for RV Camping
RV campsites can be more limited than tent campsites, primarily because you need more space. There are also a couple of different kinds of campsites you’ll see.
Full-hookups: A campsite with hookups for water, electricity, and sewer right at your campsite so that you can easily dispose of contaminated water (gray water/ black water).
Partial Hookups: A campsite with hookups for water and electricity (They will usually have a dump station nearby, but you’ll need to drive there).
Boondocking—Dispersed Camping: Using a campsite outside a proper campground. The area is still typically used for camping and managed by the Forest Service or BLM. There are usually no facilities, hookups, or other amenities.
Boondocking—Dry Camping: This form of boondocking is similar to dispersed camping because it is also off-grid, with no hookups. However, sometimes, you’ll find dry camping at campgrounds with extra facilities or amenities.
Tools to Find RV Camping Spots
- Recreation.gov (National Park Campgrounds)
- HipCamp (Unique campsites)
- Campspot
- KOA
Tools to Find Free RV Camping Spots
- The Dyrt
- Campendium
- Sēkr (Van life)
- iOverlander
- Boondock with a Harvest Hosts + Boondockers Welcome Membership—Enter CINDERS20 at checkout for 20% OFF.
- BLM Land
Backpacking or Backcountry Camping

Backcountry Camping/Backpacking is much different than traditional tent camping or RV camping because the whole point is to be as self-sufficient as possible.
It requires you to plan ahead and carry everything you need on your back, including food, tools, camping equipment, and clothing.
There are also no facilities, and sometimes the trips can be much longer. Most backpacking trips last between 1 and 3 weeks, but longer treks can last much longer.
For instance, my husband and I thru-hiked the Appalachian Trail, which took 7 months of continuous backpacking!
Types of Campgrounds for Backpacking
While backpacking, you’ll typically go deeper into nature than the average camper.
Sometimes, designated campsites are set up in the wilderness. They occasionally have a small fire ring and are almost always first come, first served.
However, most of the time, it’s up to you to find a flat spot to set up camp, cook dinner, and rest before continuing your journey.
Tools to Find Backpacking Spots
- Farout
- Recreation.gov (National Park Campgrounds)
Quick Tip: What to Consider When Choosing a Campsite
Once you’ve figured out your ideal type of camping and chosen your campground, selecting a specific campsite might seem like picking a random name out of a hat. However, the actual site location can make or break your experience.
The first thing I always do is check reviews from other campers to see if there are any specific campsites they had a good/bad experience using. Most campground websites have reviews where people mention their particular experience at a campsite.
I’ve even found helpful information from Google Maps and Tripadvisor reviews.
I’ve seen situations where people mention that a specific site is uneven, has a broken picnic table, is too close to the dumpsters, is difficult to access, etc.
But you should also double-check some other things. For example:
- Is it close to the campground facilities? Bathrooms?
- Is there a fire ring? Do they allow campfires? (Wildfire season can affect this.)
- How many people are permitted per campsite?
5. Research Your Destination
If you’ve decided to go camping in a new region or destination you haven’t been to before, this is the most exciting part of creating a camping plan.
Spending time at the campsite is fun, but you’ll want to explore the area during the day.
If you’re staying near a National Park, you can probably check out some beautiful hikes, waterfalls, lakes, and mountain peaks. You can also take some time to visit nearby villages.
I love the small mountain towns throughout the Rockies and small coastal villages on the Pacific. I also research to see if any highly-rated restaurants or museums are nearby.
6. Pick When You Will Go
The next step is deciding when to go camping.
Research where you plan to camp and see what time of year the weather is best. Then, also consider the destination’s shoulder seasons, when the weather won’t be as lovely, but the crowds will be reduced.
Most places in the U.S. offer the best camping in the summer and fall. These months provide warm temperatures and dry, sunny days for the most comfortable experience.
Some exceptions include:
- Southern California and Hawaii have excellent weather year-round.
- Texas, Arizona, and Florida are uncomfortably hot in the summer (100º+)
- Northern states, including Washington State, Montana, and Alaska, often have their major roads closed until late spring and even get the occasional snowstorm in April, so it’s better to wait until summer if you want to go camping here.
Reserve a Campsite (Sometimes Far in Advance)
One thing I feel I must mention is that if you’re going camping in a popular destination, then you should plan your camping trip well in advance.
It also depends on the time of year.
If you’re planning a camping trip to a National Park anytime between May and September, you should make your reservations far in advance. They book up VERY early.
For those who are already too late, some of my friends have had good luck signing up to receive campsite cancellation text notifications on Campnab.
You could also take your chances at a first-come, first-served campground!
Reserve a Permit (Also Sometimes Far in Advance)
Sometimes, a permit is required if you want to do any backcountry camping or embark on a longer trail where you’ll need to spend the night.
You’ll also need a permit for particularly high-demand hikes around the U.S. Some of the most challenging permits to get are Half-Dome in Yosemite National Park, Havasupai Falls, The Wave, and Angel’s Landing in Zion National Park.
Once you decide where you want to go, double-check that you don’t need a permit for anything so that you can start the application process ASAP if you do!
7. Plan Activities Ahead of Time with a Camping Itinerary
If you are camping at a campground with activities, do a little research to know what to expect before arriving.
Is there a campground pool? A Tennis Court? A basketball court? A clubhouse? A lake with a beach and water activities?
This always helps me know how much time I should budget to hang around the campsite.
Then, I can decide if I want to spend the majority of my time at the campground or if I should plan to check out some activities nearby.
Creating a basic camping itinerary before we leave helps make the most of our time and gives me something to look forward to before taking off!
Just remember to stay flexible and be willing to adjust your itinerary as needed!
8. Create a Food Plan/Meal Plan
Finding a grocery store or restaurant is not always easy when you’re out in nature. And if there is a grocery store in a national park, everything is usually priced 2-3 times its regular price.
Here’s what food to bring camping with you and how to prepare meals in nature!
I’ll break it down into camping styles because each utilizes different cookware.
Car Camping with a Tent

The nice part about car camping is that, even though it’s a bit primitive, you’re not limited by weight.
If you want to bring 3 coolers with tons of perishable food, you can (but I encourage you to be more strategic than that).
What to Bring to Eat
The key to cooking while tent camping is to keep everything as simple as possible. Don’t get overambitious and try to make a 5-star meal.
Basics like canned soup, pasta, or grilled meat and veggies are usually excellent options!
Here are some great food items to bring along for car camping meals:
- Canned Soup, Beans & Veggies
- Pasta & Pasta Sauce
- Produce that doesn’t spoil quickly (Apples, oranges, carrots, bell peppers, etc.)
- Sausage/Bacon, Eggs, and other cured meat.
- Salt & Pepper
Cooking oil is also great to have. It makes cooking easier and protects your pots/pans since most lightweight camping cookware is stainless steel, aluminum, or titanium.
I also like having non-perishable snacks like nuts, granola bars, and dried fruit.
Car Camping Cooking Gear
There is fancy lightweight camping cookware (which you do need for backpacking). However, you can usually use what you already have at home when car camping.
Here’s a list of the cooking gear that I pack for tent camping:
- Portable Stove
- Pots and pans
- Cooking utensils (spatula, tongs, knife)
- Plates, bowls, and cutlery
- Soap & Sponge for clean-up
Cooler
You’ll need a cooler if you plan to bring meat, cheese, or other perishable food.
A smaller cooler might be enough for short trips, but if you’re spending a week in the woods, you should probably have a solid 52-quart cooler.
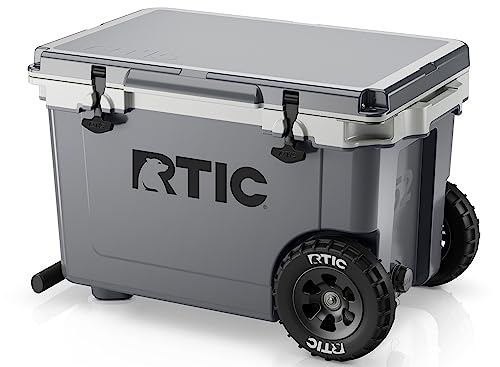
- ALL-TERRAIN WHEELED COOLER – Venture into the great outdoors with confidence, equipped with the RTIC Ultra-Light insulated cooler with wheels, equipped with puncture-resistant, all-terrain wheels to effortlessly traverse through rough terrains.
Make sure your cooler has a sound drainage system for melted ice. And having one with wheels will make life much easier!
Water
Most campgrounds have a fill station with potable water for drinking, cooking, and cleaning. Still, you should always bring plenty of water when camping, just in case.
RV or Van Camping

RV or Van Camping is way more comfortable. It’s significantly easier to prepare meals in the small kitchenette, which typically has a stove, minifridge, and sink.
You can also bring a wider variety of food for the trip.
What to Bring to Eat
An RV or van also has more storage space; some even have a small freezer, which allows you to keep perishable foods longer.
Honestly, you can cook just about anything that you’d make at home. Some RVs even have a full oven and microwave.
But I’d still encourage you to keep it simple.
- Eggs, sausage/bacon, cereal, and yogurt
- Fresh fruits and vegetables
- Pasta, rice, canned goods, canned soup
- Salt, pepper, & basic spices
- Chips, crackers, dips, granola bars, and other snacks
RV Camping Cooking Gear
Your van or RV will probably have built-in cooking and food storage amenities, so you should consider which meals you’d like to make beforehand and bring along as many ingredients as possible.
We’re usually good with just a couple of pots, pans, baking dishes (if you have an oven), cooking utensils, and some pantry items like aluminum foil & plastic bags.
Cooler
Some people still like to bring a cooler for drinks and extra storage, but if you’re in an RV, the fridge should be enough to keep your perishables cool.
Water
RVs and vans often have built-in water tanks, and the city water hookups at most campgrounds are generally water-potable.
More seasoned RVers will purchase an inline RV water filter and a drinking water-safe hose to ensure the water from the hookup is clean and safe for drinking.
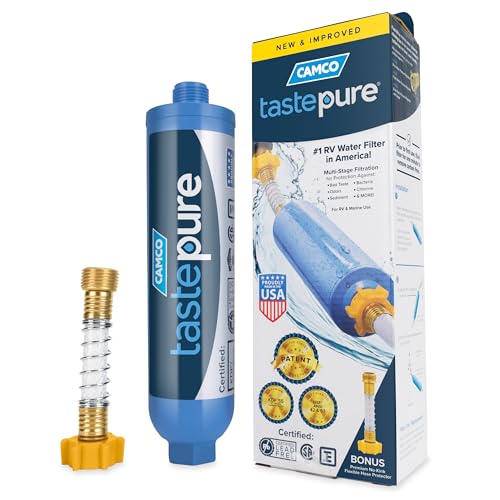
- Advanced 6-Step Filtration Technology: Discover the impressive power of the Tastepure RV water filter’s Hex-Flow Technology and its 6-step filtration process. Each layer seamlessly works together to deliver water that’s exceptionally clean.

- Professional Plus Drinking Water Hose: Camco's EvoFlex Professional Plus RV fresh water hose is lead, BPA, & phthalate-free. This quality PVC hose prioritizes your health with every use.
However, I know many people who prefer to bring bottled water and only use the water hookup for cooking, showering, or cleaning.
Backpacking or Backcountry Camping

When backpacking, weight and space are your biggest concerns, so it will look different from preparing meals for tent camping or an RV trip.
What to Bring to Eat
The food you’ll eat backpacking is very similar to the food you might bring hiking.
Look for high-energy, high-calorie snacks that are tasty, nutritious, and easy to carry. I find some of the best things to have for the campground and hiking snacks are;
- Energy bites/bars/chews
- Trail mix
- Dried fruit
- Crackers
- Meat sticks, pepperoni slices, and beef jerky
But you need enough to sustain you for a week or two. Even with limited cooking options, instant noodles, rice, couscous, and dried beans/lentils are staples because they’re good carbohydrates and quick to prepare.
Pairing these staples with vegetables, tuna, or chicken packets is easy.
But the most convenient option for backpackers is freeze-dried meals, which taste much better than expected! The only issue is that they are way more expensive and tend not to be super filling (my husband sometimes has to eat two for dinner).
Backpacking Camping Cooking Gear
Backpacking gear needs to be lightweight and compact. Here’s what you should bring:
- Lightweight camping stove and extra fuel
- Compact cookware: A small pot, pan, cup, and spork should be enough.
- Biodegradable soap: For washing dishes.
Most backpackers prefer to save space and eat directly out of the pot or pan in which they cook their meals.
Water
Drinking water can be harder to come by when backpacking, but you will need a lot to stay hydrated during long days of hiking.
It’s unrealistic to boil water every time you need to refill your water bladder, so most people either buy water-purification packets or do what we do and get a water bladder and filter, which you can use to purify water found along the trail.
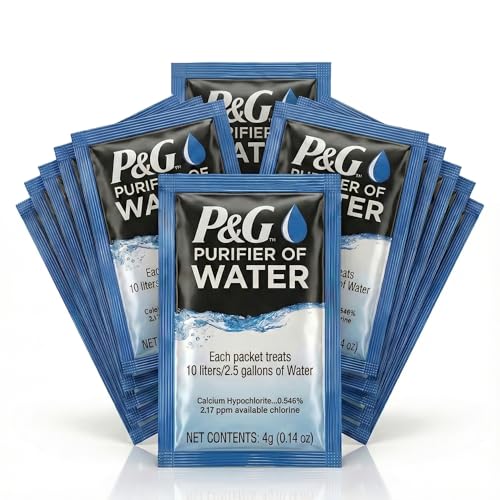
- TREAT YOUR WATER - P&G Purifier of Water Packets are highly effective and are registered as a disinfectant by the EPA. These emergency water pouches remove 99.9999% of bacteria and 99.99% of viruses.

- Compact, fast-flowing and compatible with a wide variety of water bottles and reservoirs, the QuickDraw is the best water filter for your personalized filtration system
9. Round Up Your Camping Gear
It can also be overwhelming to think about what to bring on a camping trip. A good rule of thumb is to make sure you have the 10 essentials.
These ten essentials include:
- Navigation (map/compass)
- A headlamp (with extra batteries)
- Sun protection
- A first-aid kit
- A knife
- A firestarter (matches/lighter)
- Shelter (can be a light emergency bivy)
- Extra food
- Extra water
- Extra clothes
I’d also add a power bank to that list. These days, most of us use our phones as a compass, flashlight, and map, so it’s vital to have extra juice when needed.
Here are some quick links to packing lists and resources for each kind of camping:
Car Camping with a Tent

RV or Van Camping

- The Definitive List of RV Must-Haves for 2025 (From a Full-Time RVer)
- Downloadable RV Must-Haves Packing List
Backpacking or Backcountry Camping

10. Test Your Camping Gear
Testing your camping gear before you leave might seem excessive, but nothing ruins a camping trip quicker than arriving at the campsite and finding out that the tent you haven’t opened in years has a broken zipper or your stove won’t turn on.
Do a quick test run of EVERYTHING.
Set up your tent in the backyard, fire up your portable stove at home, blow up your sleeping pad, and check your sleeping bag for holes.
Double-checking everything will make you less stressed about your camping trip!
11. Pack for Your Camping Trip
Now, it’s time to start packing for the trip. You have everything you need, but I have learned a few strategies that make everything fit more easily.
Car Camping with a Tent
When packing for car camping, organization is key because you don’t have a lot of space. Start by categorizing your gear into groups, such as sleeping gear, cooking equipment, personal items, and recreational gear.
I like to use clear plastic bins because I can see everything without opening them, and it’s easy to find what you need without unpacking everything.
I also like to keep the things I use most often, such as snacks, water bottles, and toiletries, in the back seat or at the top of the truck.
RV or Van Camping
It can be very easy to overpack when camping in an RV or van. Since you have plenty of space, you might start thinking, “Well, we might want to have __ around.”
I can speak from experience. Loading the RV up with too many things is the quickest way for the rig to feel cluttered and lose track of what you need.
Another important thing to remember while packing a van or an RV is to keep the weight distribution equal to ensure good stability while driving.
Do your best to store everything in its designated area (bedding near the sleeping area, kitchen utensils near the stove, etc.), and always secure everything with bungee cords or Velcro straps to prevent them from shifting during transit.
Backpacking or Backcountry Camping
Packing for a lengthy backpacking trip requires practice. Before a backpacking trip, it’s not unreasonable to pack, unpack, and repack your bag many times to ensure everything fits comfortably.
Begin by laying out all your gear and evaluating what is essential.
Pack your sleeping bag and other items only for camp at the bottom of your pack, followed by your tent and cooking gear. Then, fill any gaps with clothing and lighter items to maximize space. Most backpacks have a specific compartment for your water bladder and small pockets on the outside for loose items.
A pro tip is to keep the heavier items centered and close to your back. This makes it a lot easier to carry long distances. You can also use compression bags (a.k.a. stuff sacks) to reduce the bulk of your gear.
12. Amenities
If you are camping at a campground with amenities, know that they are not always the most reliable. Do a quick search to familiarize yourself with the facilities nearby.
We try to have a backup plan in case the internet doesn’t work or they’ve run out of firewood for the evening.
Internet
Some campgrounds offer Wi-Fi, which may be limited to certain areas and is often not functional. Just in case they don’t have a solid connection, I always download all of the maps we might need, movies, and other entertainment ahead of time.
You can bring a personal hotspot with you or use your phone’s hotspot if you have cell service at the campsite.
👉 Learn about further RV internet options here.
Firewood
You can always bring firewood from home, but many campgrounds sell firewood and encourage people to buy firewood on-site to prevent the spread of invasive species.
If there isn’t any firewood for sale at the campground, or they’ve run out, you can usually find some at a nearby gas station or grocery store.
Ice
It’s pretty easy to replace the ice in your cooler. The campground may have an ice machine or sell ice bags; if not, local gas stations, grocery stores, or camp stores almost always carry it.
Consider buying a dry ice sheet if you’re camping in Utah, Arizona, or another extremely hot area. This ice is much colder than regular ice and releases as a gas, so it won’t make everything soggy.
(Just never touch dry ice with your bare hands!)
Fuel
The same principles apply to fuel. While camping, you’ll be using propane gas for your fuel.
Campgrounds sometimes have a small store where you can buy more canisters for your portable stove or refill your RV’s propane tanks.
Similar to other amenities, if you run out or do not have access to a store at the campground, nearby gas stations or grocery stores should also sell them.
13. Revel in Your Hard Work and Enjoy the Great Outdoors!
That’s everything! After following these steps, you’ll have a complete camping plan! The only thing left to do is sit back and enjoy camping.
It’s a rewarding feeling, and while it seems like a lot to think about at first, there isn’t much left to do while camping.
You have everything you need to cook meals, all your supplies and sleeping equipment are set up, and you know what’s available at the campground, along with nearby attractions, so when you feel like doing something, the research is done!
So, take a minute to walk around the campsite, explore nearby hiking trails, or set up a hammock and enjoy the current novel you’re reading!
Extra Tips
Before I leave you on your own, here are a few additional tips I’ve learned over the years:
Weather
Always check the weather forecast beforehand, and be prepared for all possible conditions.
Pack extra waterproof layers, carry the rain cover for your backpack (when backpacking), and always keep a dry sack with you for your technology.
Also, if you’re in an area where afternoon storms are common, schedule any hikes or summits for the morning because it’s dangerous to be at such high elevations during a storm.
Safety
⛑️ Learn how to store food safely, using bear-proof canisters to avoid attracting animals.
Most animals will not bother you at a campsite. The noise and fire scare them away, and contrary to what you might feel, they are more scared of us than we are of them (even bears).
Keep a safe distance from all wildlife, and never feed them.
⛑️ Carry a first-aid kit with you to help with minor injuries.
⛑️ Always share your camping itinerary with a trusted person.
Let them know where you plan to go and your expected return time. Schedule a time to check in with them so they can call for help if they don’t hear from you.
Download Offline Maps
Downloading offline maps is a huge way to stay safe on the trails.
Cell service can be spotty at campgrounds and throughout National Parks, so some people even like investing in a Gaia GPS.
But if you don’t have the budget for that, apps like AllTrails or Google Maps allow you to download the region/trails and continue showing your geo tracker, even without cell service.
Set Up Camp in the Daytime
I can personally attest that setting up camp in the dark is no fun.
It actually sucks big time, and if you’re a first-time camper, I cannot convey enough how challenging and stressful this can be.
Plan to leave with enough time to set everything up. Most campsites allow you to show up anytime after 3 PM (checkout for the previous camper is typically around 11 AM), so get there shortly after that.
If you have some spare time, that’s just more time to relax at the campsite!
Leave No Trace
The Leave No Trace (LNT) principles are easy to understand, and practicing them helps minimize your impact on the environment. These include:
- Packing out all your trash.
- Respecting wildlife.
- Staying on marked trails.
- Leaving natural objects as you find them.
The main point is to leave every campsite better than you found it and respect the nature around you.
Conclusion: Forming a Great Camping Plan
Hopefully, you now feel significantly more confident about planning a camping trip for yourself, your friends, and your family.
If you’ve never been camping before, it’s A LOT to think about!
The most important thing to remember is to choose a camping style and duration that’s right for you.
For first-timers, the most inexpensive and accessible option is to plan a two—or three-day car camping trip near their hometown.
Then, if you love it, you can plan a more extensive backpacking trip!
You May Also Enjoy:
👉 How to Plan a Backpacking Trip in 16 Easy Steps
👉 The Definitive List of RV Must-Haves (From a Full-Time RVer)
👉 Healthy Food for Hiking that Will Boost Your Energy on Trail
👉 What Is Boondocking? Everything You Need to Know Before You Go
- Packing for a Thru-Hike: How I Chose My Gear for Trail - January 8, 2026
- A Complete Two-Day Guide to Visiting Death Valley from Las Vegas - December 16, 2025
- Hiking the Appalachian Trail: Week 9 – Grayson Highlands Ponies & Longhorns - November 30, 2025